Traffic assignment#
Having verified that the network seems to be in order, one can proceed to perform traffic assignment, since we have a demand matrix.
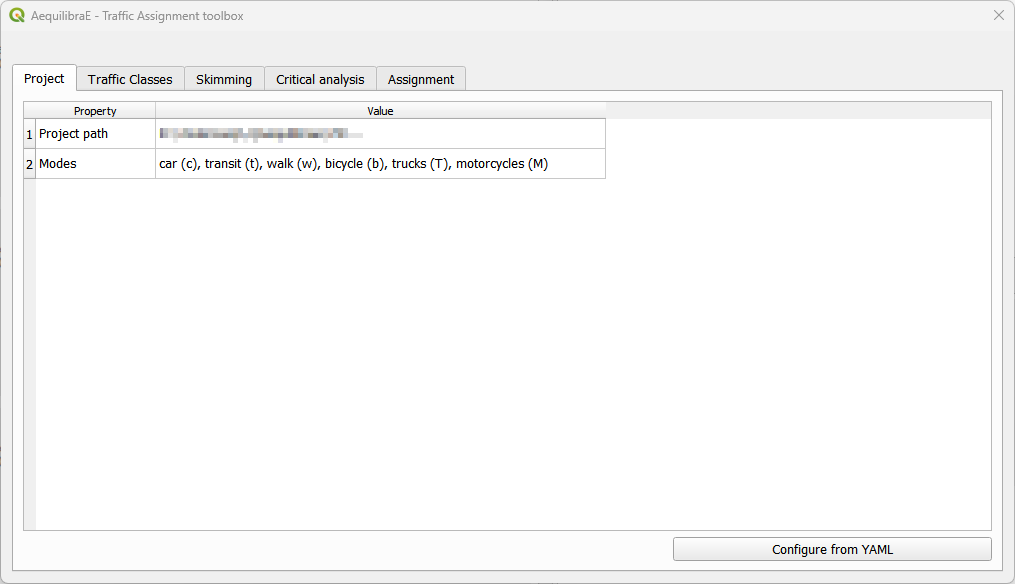
The Traffic Assignment window currently has five tabs. The first one is the Project tab where you can check the project path and the available modes. In the Project tab it is also possible to load configuration from a YAML file.
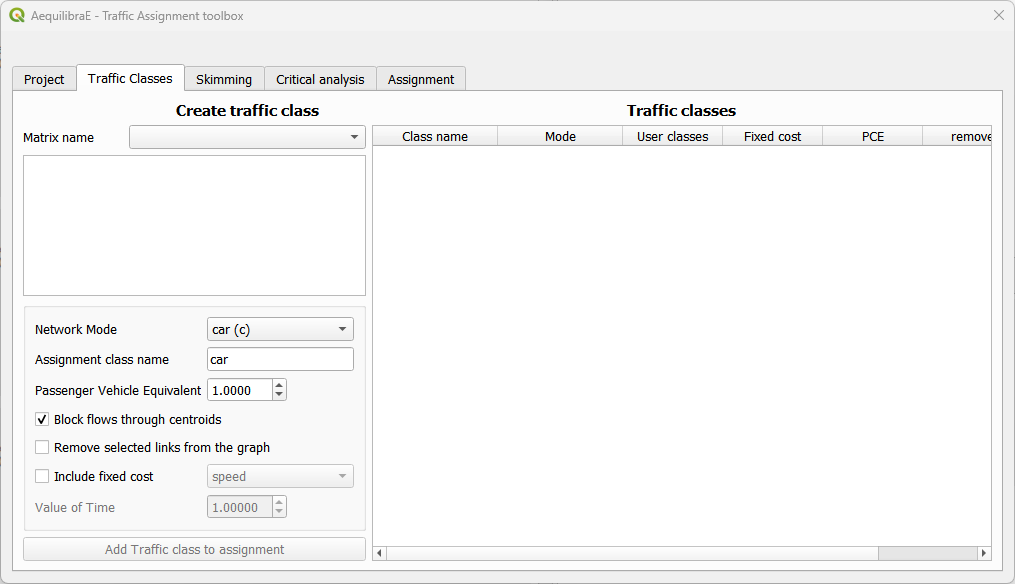
In the Traffic Classes tab you will create the traffic classes and graphs used in the project. This is where one of the available matrices and its core for computation are selected. We can modify the passenger car equivalent (PCE) for whatever value applies in your analysis, as well as include the value of time (VOT) as fixed cost. It is also possible to remove links from the analysis by selecting them before opening the Traffic Assignment window, and toggling the button Remove selected links from the graph. More about graph configuration can be found in the AequilibraE documentation.
Important
For setting a fixed cost, one must have a value fot the vot column in the project modes table.
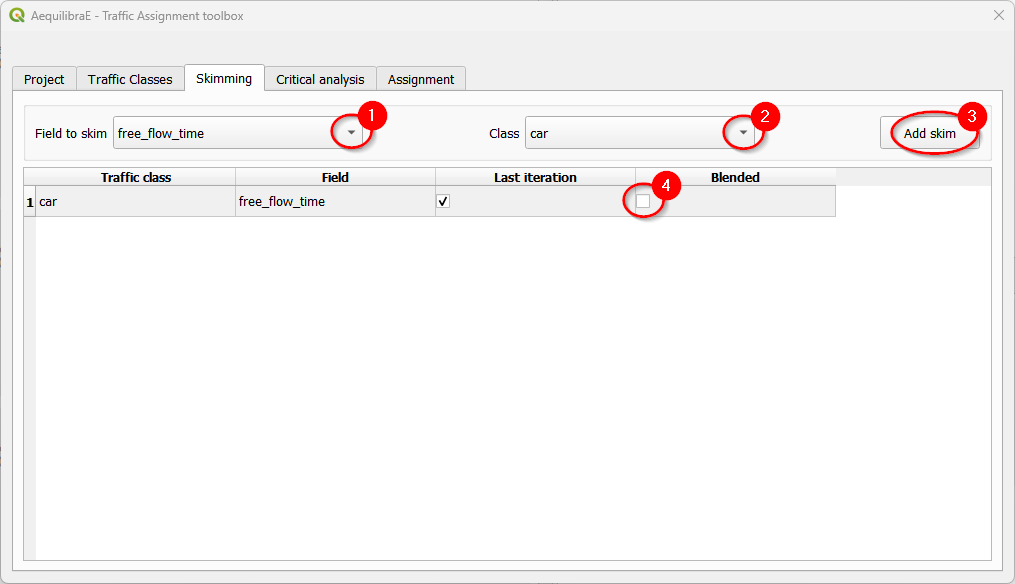
In the Skimming tab it is possible to select the skimming fields for each traffic class, and the results desired: final or blended. Final stands for the result of the last iteration, while blended represents the averaged results for all iterations. Just check the desired boxes. Notice that the Class field only is populated if the traffic classes were properly set in the previous step.

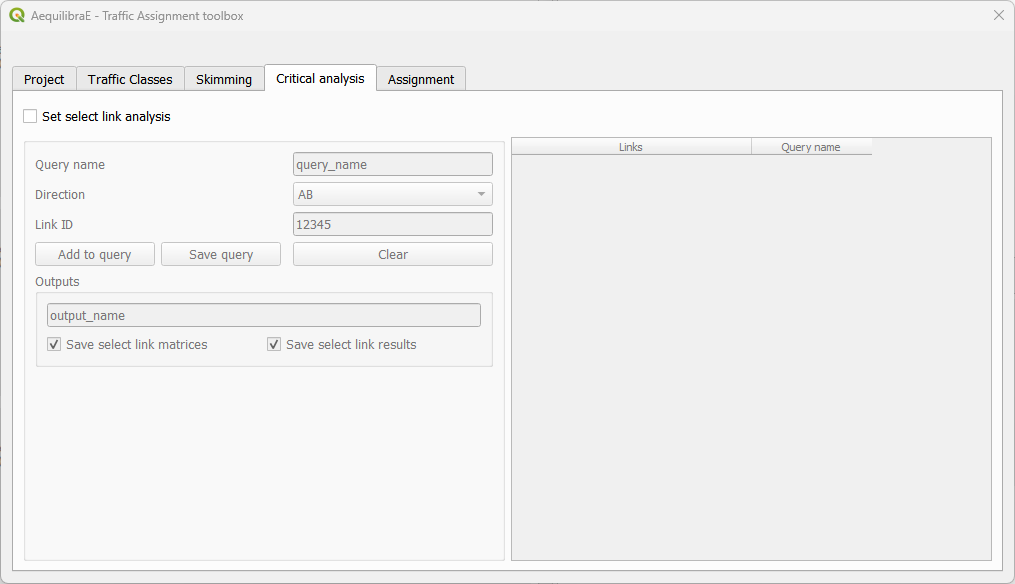
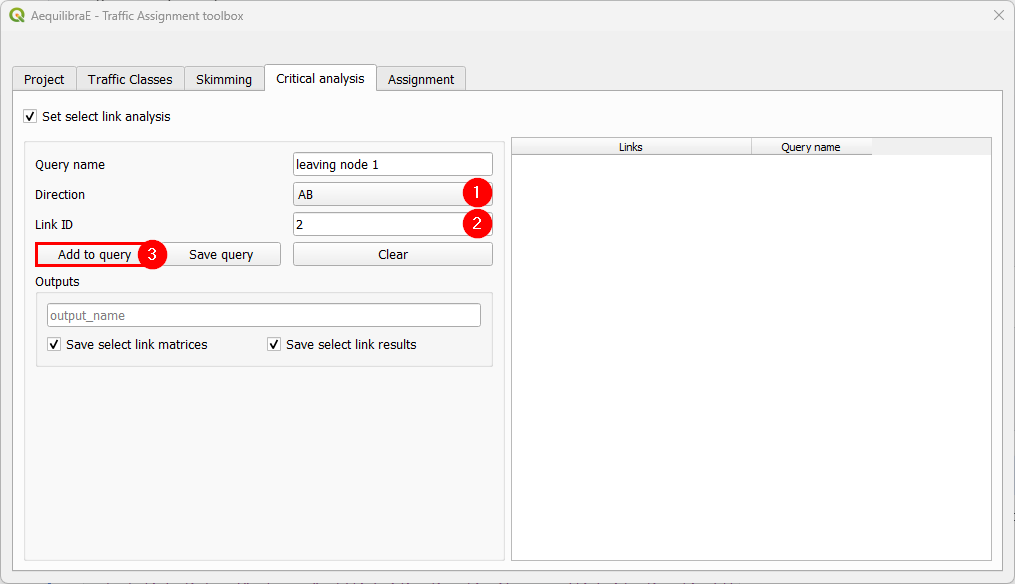
The Critical analysis tab allows running a select link analysis with the traffic assignment. QAequilibraE default configuration is NOT running this analysis, so you have to toggle its button to ‘activate’ the configuration interface. There, it is possible to set up a query name, a travel direction, and the link ID. Adding and removing links from queries, and modifying queries should be straightforward. Saving the output matrices and results for select link analysis are also configured here.
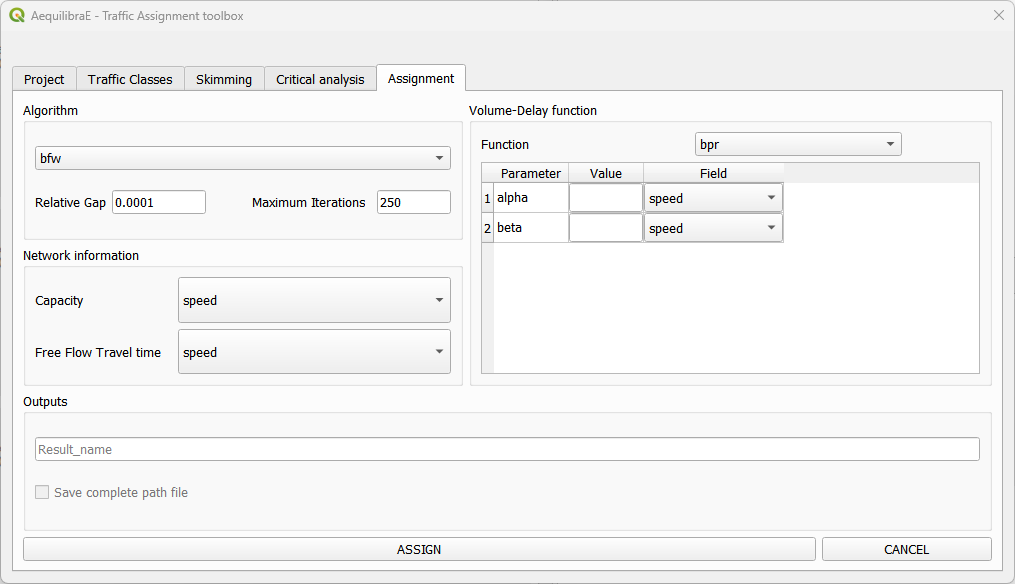
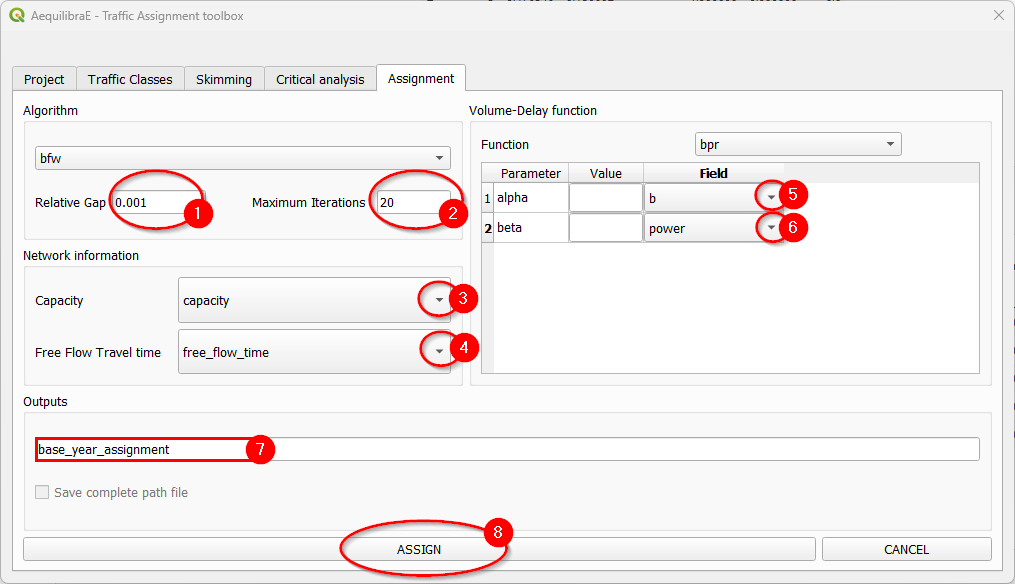
In the Assignment tab we select the assignment algorithm and configure the volume-delay function and its alpha and beta parameters. The fields for link capacity and free flow travel time are selected. We also confirm the relative gap and maximum number of iterations we want, and the output folder. Now it is possible to save your project configurations in either one Python or YAML file. While the Python file is stored inside the project run folder to be executed as part of ‘Run procedures’, the YAML file can be used as input for other model runs, as input in the Project tab.
Basic workflow#
Let’s run a traffic assignment for Sioux Falls. You don’t have to worry with demand matrices: we’ll use one of the matrices already available in the model.
We start selecting one of the available matrices and the matrix core that will be used for computation. We must click on the matrix core to select it (2), otherwise the traffic class creation will fail. As this is a single class traffic assignment, we’ll use the default configurations for network mode and assignment class name (3 and 4). For the Sioux Falls example, we don’t want to block flow through centroids because regular nodes of the network are centroids (5). When you finish, just hit the Add Traffic class to assignment button (6). You will notice that your traffic class will automatically appear at the table at the right-hand side of the screen.

To select skims, we need to choose which fields/modes we will skim. If no mode appears at the class field, you should have missed any configuration on the traffic classes tab before. Let’s continue with ‘free_flow_time’ and ‘distance’. We select the field to skim (1) and the class (2) and add it (3) to the skimming table, at the bottom. Let’s skim ‘free_flow_time’ only for the last iteration by untoggling the ‘blended’ check box (4).
Let’s repeat the skim selection process for ‘distance’, but now we’ll use the blended results.
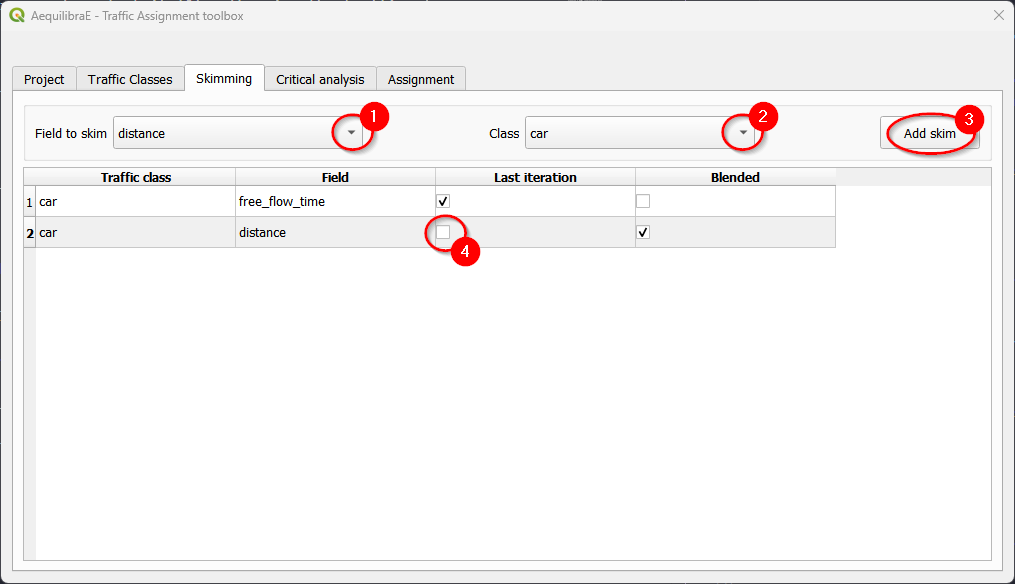
If you want to have skims for both final and blended, you don’t have to untoggle any check boxes!
Then, we can choose to run a select link analysis. Its default configuration is not to select any links, so we have to toggle its “Set select link analysis” button (1). The creation of queries for analysis consists in: create a name for the query, select the travel direction, add the link ID, and click on Add to query, to temporarily save the data to the query.
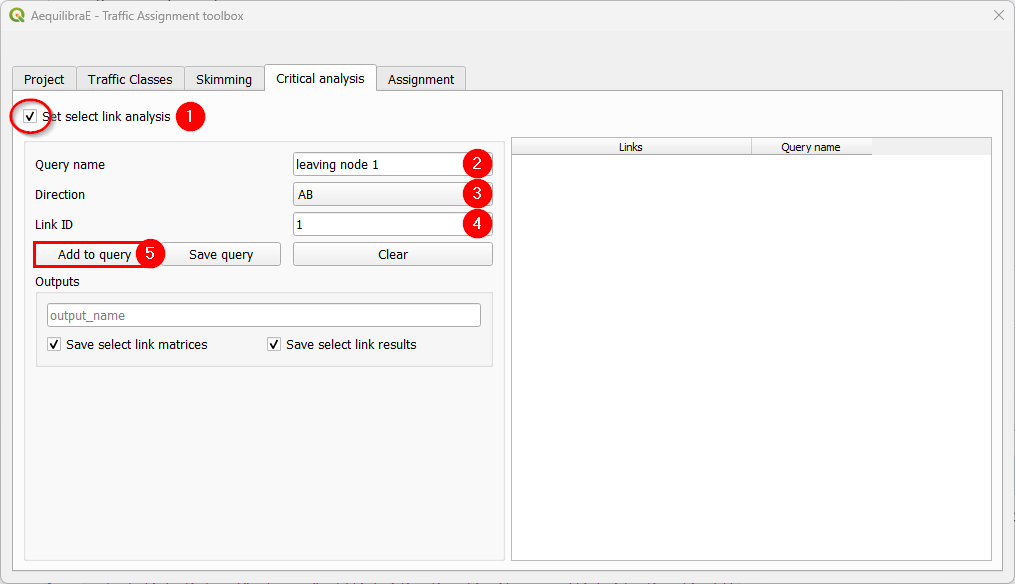
Adding more links to the previous query is straightforward. Select the direction and the link ID, and press Add to query once again.
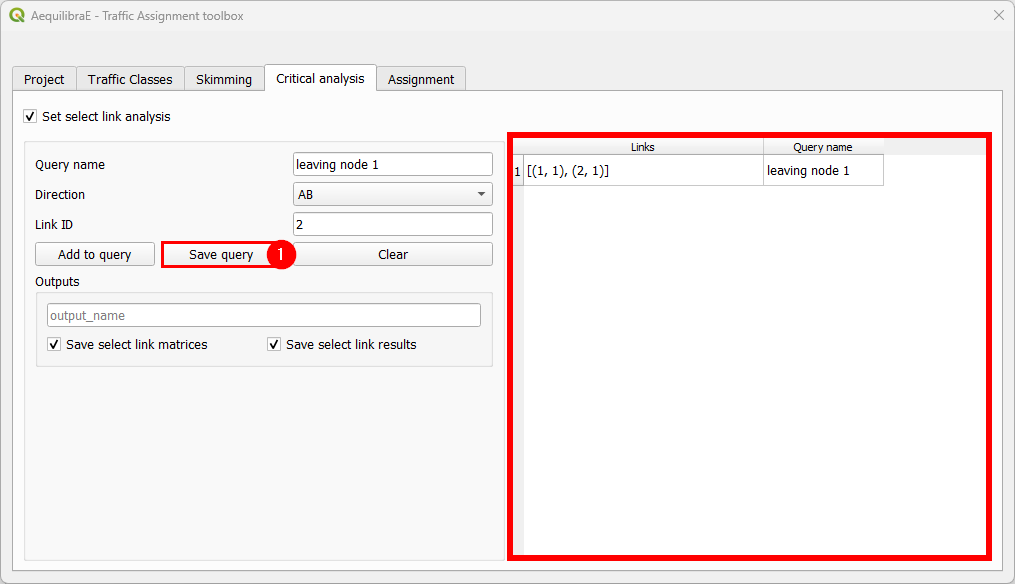
When we are done with the current query, we click on Save query, and notice that the query with the selected links is going to appear in the right-hand side queries table.
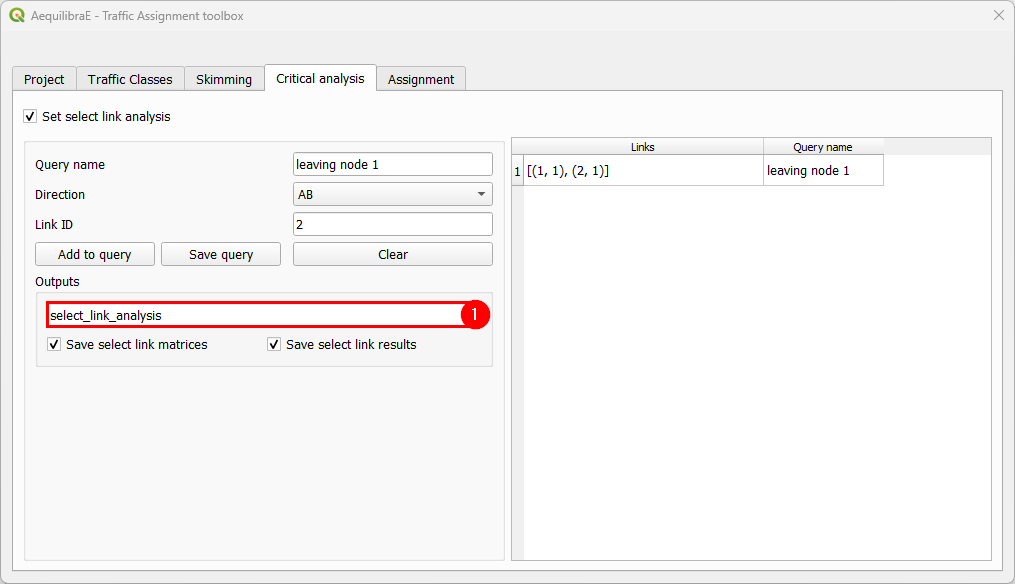
To finish the select link analysis step, we choose one name to save one or both of the matrix and results files.
The final step is to setup the assignment itself, by selecting the algorithms, setting up the relative gap and maximum number of iterations, volume-delay function, network information, and the assignment output name. When configuring the parameters of the VDF function, it is possible to use a value by typing it or an existing field. When configurations are done, just click on the “Assign” button and wait for the results. When QAequilibraE finishes the assignment procedure, the traffic assignment window automatically close.
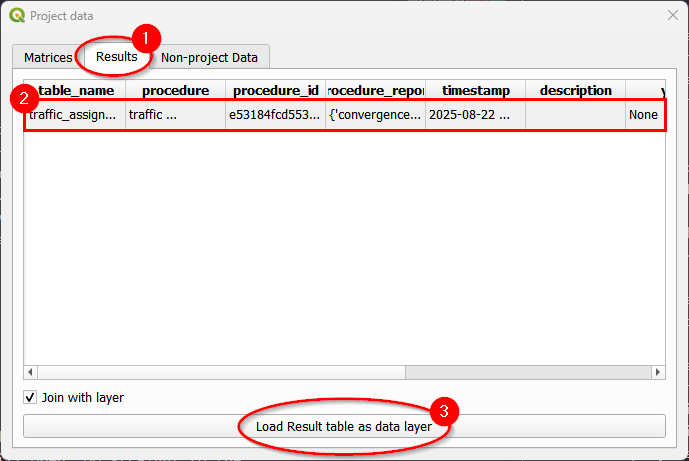
The result of the traffic assignment we just performed is stored in the results database within the project folder. It can be easily accessed and loaded by clicking Mapping > Visualize data, and a project data window will open. Go straight to the Results tab (1), and select the desired result (2), let the Join with layer option checked, and click in the Load Result table as data layer button at the bottom (3). The result table layer will be automatically joined with the links layer and will appear at your QGIS mapping canvas area.
If you want to enhance your data visualization, now we can revisit the instructions for Stacked Bandwidth
Creating a YAML configuration file#
One update in QAequilibraE’s Traffic Assignment is allowing the user to load the assignment configurations from an YAML file. In this section we present how you can manually set up your YAML file.
The main file keys are ‘traffic_classes’ and ‘assignment’: they are mandatory and contain the basics of traffic assignment configuration.
When configuring a traffic class, use lists with dictionaries. The item corresponds to the dictionary key and is going to be your traffic class name. If you have more than one traffic class, as in multi-class assignment, each class is configured in the same way.
For each traffic class, the fields ‘skims’, ‘fixed_cost’, and ‘vot’ are optional. If you are going to use any of them, make sure to properly fill the values. For ‘skims’, add the skim and which results are desired: final (results of the final iteration) or blended (averaged results for all iterations).
The ‘select_links’ section is completely optional, however if you are using it the fields ‘output_name’ and ‘selection’ are required. ‘save_matrix’ and ‘save_results’ defaults to
True. We encourage using them only if you don’t want to save any of the outputs. The selection contains dictionaries whose keys are query names and the values are a list of lists containing the ‘link_id’ and ‘link_direction’ (check the direction section here).
Notice that all lines that are commented in the code below are optional.
traffic_classes:
  - car:
      matrix_name: demand_omx
      matrix_core: matrix
      network_mode: c
      pce: 1.0
      blocked_centroid_flows: False
      # skims:
      #   free_flow_time: [final]
      #   distance: [blended]
      # fixed_cost: vot
      # vot: 1.05
assignment:
  algorithm: bfw
  max_iter: 25
  rgap: 0.001
  vdf: BPR
  alpha: 0.15
  beta: 4.0
  capacity_field: capacity
  time_field: free_flow_time
  result_name: result_test_from_yaml
# select_links:
#   output_name: select_link_analysis_from_yaml
#   save_matrix: True  # optional
#   save_result: True  # optional
#   selection: # name with a list of lists as [[link_id, link_direction]]
#     from_node_1: [[1, 1], [2, 1]]
#     random_nodes: [[3, 1], [5, 1]]